BlkSeal enables applications to sign content and later verify that the content received, displayed, or processed still
matches what was originally generated. This guide covers integrating signing, verification, browser trust indicators,
tamper detection, and content integrity workflows using the BlkSeal platform.
Who is this guide for?
Developers integrating BlkSeal into web applications, APIs, AI assistants, agentic systems, messaging platforms, streaming applications, and content verification workflows.
Overview
BlkSeal integrations usually consist of two parts:
1. Backend Signing
Your backend or source system that generates the final content should call the BlkSeal signing API using either the Python SDK or the raw API.
Signing should always happen server-side because it requires authenticated OAuth credentials.
The generated content and returned signature should then be stored, transmitted, or streamed together to the destination system.
2. Signature Verification
The target system that receives the signed content should verify the content against the signature to ensure the content has not been modified.
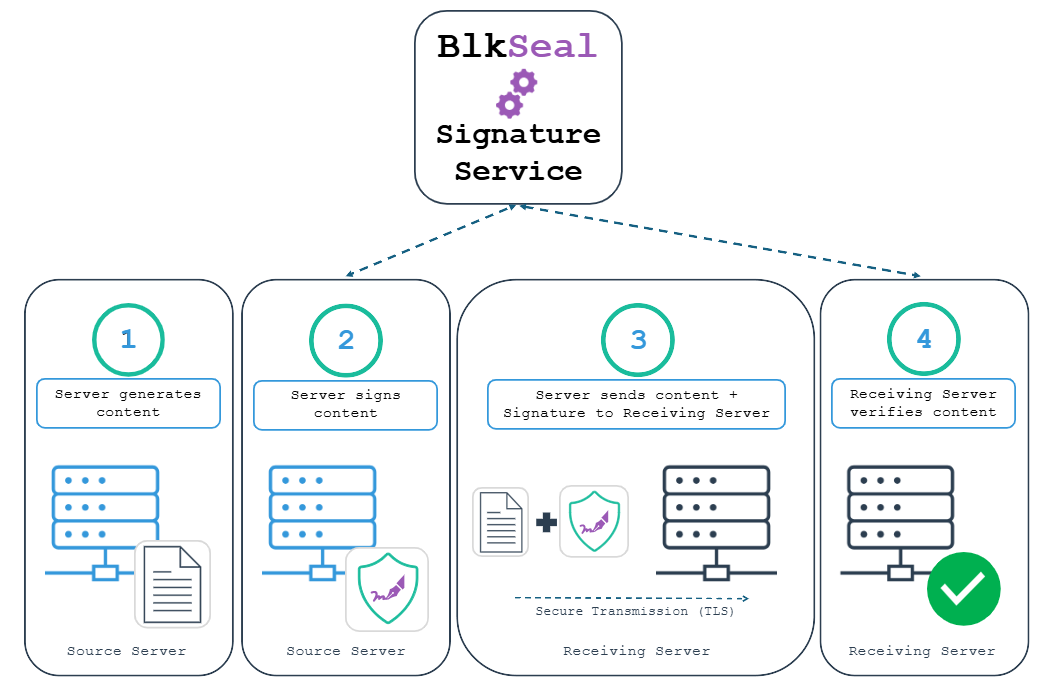
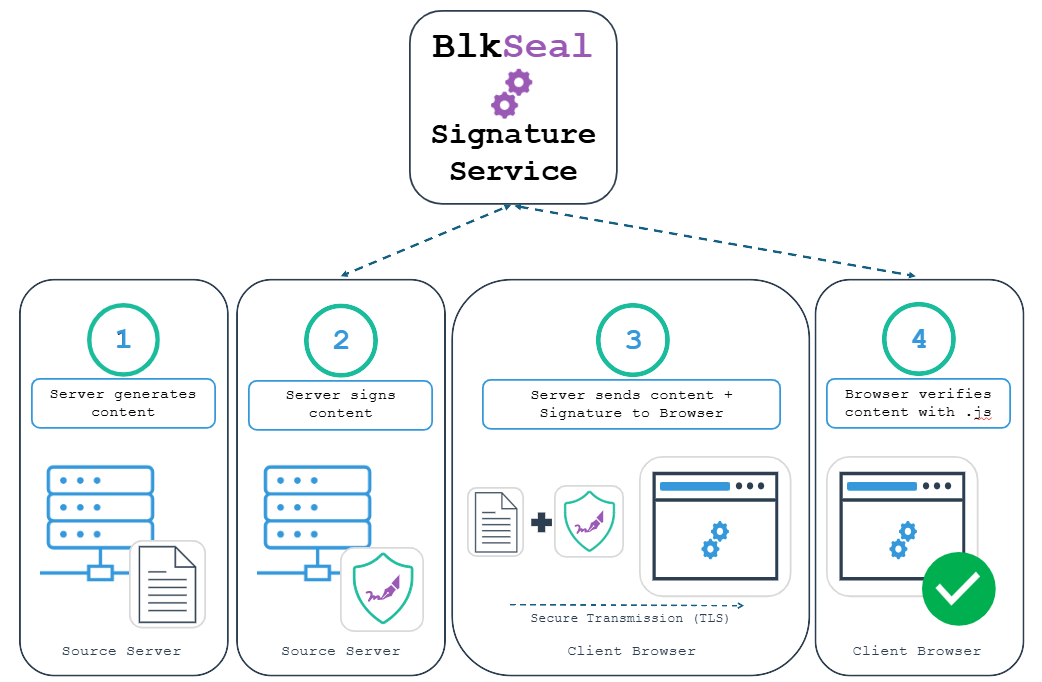
BlkSeal supports both server-to-client and server-to-server verification workflows.
Server-to-Client Verification
Your frontend renders the signed content, attaches the returned signature to the message or content element, and uses blkseal-browser.js to automatically verify the content against the BlkSeal public verification endpoint.
This is commonly used for AI chat interfaces, streaming assistants, dashboards, notifications, or other browser-rendered content.
Server-to-Server Verification
The receiving backend system verifies the signed content directly using the BlkSeal verify API, either through the Python SDK or the raw API.
This is commonly used for APIs, webhooks, service integrations, and automated processing systems.
Verification Endpoints
BlkSeal provides both public and private verification endpoints.
The public verification endpoint does not require authentication, but is rate limited.
The private verification endpoint requires OAuth authentication and is governed by your subscription limits.
Use this checklist to confirm your BlkSeal integration is ready for testing or production use.
Account and Access
Created a lyfe.ninja account.
Enabled developer access.
Created an OAuth application.
Saved the OAuth client ID and client secret securely.
Confirmed the OAuth application has the required scopes, typically sign:content verify:content.
Lease Setup
Created a BlkSeal lease.
Saved the lease ID for backend signing requests.
Confirmed the lease is active and available for signing.
Backend Signing
Installed and configured the Python SDK, or prepared raw API calls.
Stored OAuth credentials and lease IDs as server-side environment variables.
Confirmed signing happens server-side only.
Confirmed OAuth client secrets are never exposed to frontend code.
Signed only finalized content.
Returned or transmitted the generated content and signature together.
Sign media bytes instead of URLs whenever practical.
Verification
Used the public verification endpoint for browser-based verification.
Used the private verification endpoint for authenticated server-side verification.
Verified content before displaying, trusting, storing, or processing it in sensitive workflows.
Confirmed verification uses the same data_type used during signing.
Browser Verification
Included blkseal.css and blkseal-browser.js on pages that display signed content.
Configured a BlkSealVerifier instance.
Set selector for the outer signed content element.
Set contentSelector for the visible content element.
Stored the exact signed content in data-blkseal-content whenever possible.
Tested selectors using BlkSealDebug.testSelector().
Confirmed tamper detection behaves as expected when content changes after verification.
Enabled verifyMedia: true when using browser-based media verification.
Configure CORS requirements for any external media host when used with browser media verification.
Streaming/SSE Integrations
Collected all streamed tokens or chunks into the final assembled text.
Signed the final assembled text, not individual tokens.
Sent the signed, signature_error, or signature_skipped event before complete.
Stored the completed signed content in data-blkseal-content before triggering browser verification.
Files and Large Content
Used sign_bytes() or data_type="hash" for files, binary data, and large payloads.
Confirmed SHA-256 hashes are generated from the exact bytes being signed or verified.
Confirmed the original file contents are not sent to BlkSeal when using hash-based signing.
Operational Readiness
Logged signing errors, verification failures, and tamper-detection events where appropriate.
Defined what your application should do when verification fails.
Tested expired, revoked, missing, and invalid signatures.
Confirmed rate limits and subscription limits are acceptable for your expected usage.
Recommendation: Before going live, test one successful signing flow, one successful verification flow, one tampered-content failure, and one signing or verification error path.
A lease represents a signing authority within the BlkSeal platform. Every signature generated by BlkSeal is associated with the lease used to create it.
Behind the scenes, leases are linked to a specific BlkBolt encoding model. When content is signed, the lease determines which model is used to generate and verify the signature. This allows signatures to be associated with a particular application, tenant, environment, agent, or other trust boundary.
Leases also provide lifecycle and revocation controls for signing authority without requiring applications to rotate cryptographic key pairs or redistribute public keys.
Model Association — Every lease is associated with a specific BlkBolt encoding model used during signing and verification.
Soft Revocation — Leases can expire automatically or be revoked manually. Once a lease is no longer active, new signatures cannot be generated using that lease.
Lease Rotation — Applications can transition to a new lease while maintaining historical verification records for previously signed content.
Verification Metadata — Verification responses include the originating lease identifier, allowing systems to determine which signing authority produced a signature.
Multi-Tenant Support — Separate leases can be used for different applications, customers, agents, environments, or workflows.
Revocation Note: Lease expiration and revocation provide a "soft" revocation mechanism by preventing future signatures from being generated with that lease, or preventing existing signatures from validating successfully (although they can still be decoded). Depending on your deployment model, additional controls may also be available to retire or remove the underlying BlkBolt model entirely, providing a stronger form of revocation.
BlkSeal can be integrated from any language or platform capable of making HTTPS requests.
The Python SDK shown in this guide is a convenience wrapper around the REST API. If you are integrating from another language, you can interact directly with the API endpoints shown below.
Tip: Python developers should generally use the SDK instead of calling the REST API directly. The SDK automatically manages OAuth tokens, retries expired tokens, and provides helper methods for hashing, signing, and verification.
API Reference Documentation
The BlkSeal signature service provides interactive OpenAPI / Swagger documentation for all public endpoints.
The documentation includes request schemas, response schemas, authentication requirements, and an interactive interface for testing API calls directly from your browser.
Tip: If you are integrating BlkSeal from a language that does not yet have an official SDK, the OpenAPI documentation is the best reference for building a custom client.
Step 1: Obtain an OAuth Access Token
Protected endpoints require an OAuth access token obtained using the Client Credentials flow.
Both verification endpoints return verification results indicating whether the supplied content matches the original signed content along with additional metadata.
Results and metadata may include:
request_id — Unique identifier for the signing or verification request. Useful for troubleshooting, auditing, and support inquiries.
lease_id — Identifier of the lease used to generate the signature. This can be used to associate signatures with a specific application, tenant, model, or signing authority.
create_ts — Timestamp indicating when the signature was created. The value is represented as a Unix timestamp with fractional seconds.
encoded_hash — SHA-256 hash of the content provided during signing. This value can be used to independently confirm which content was processed without exposing the original content.
valid — Verification result indicating whether the supplied content matches the original signed content. A value of true indicates successful verification, while false indicates the content, signature, or metadata does not match.
Supported Data Types
BlkSeal supports signing both raw content and pre-computed hashes.
The appropriate option depends on your use case.
String Data
Use data_type="string" when signing text directly. This is the most common option for AI-generated content, chat messages, notifications, emails, API responses, and other text-based content.
{
"data": "Hello World!",
"data_type": "string"
}
Hash Data
Use data_type="hash" when signing a SHA-256 hash instead of the original content. This is useful for large files, binary content, images, PDFs, documents, or situations where transmitting the original content to BlkSeal is undesirable.
Using lru_cache(maxsize=1) creates the SDK client lazily and reuses it across requests, reducing initialization overhead and keeping your integration code simple.
Tip: Create the client once during application startup or cache it using a pattern similar to the example above. Avoid creating a new SDK client for every request.
The SDK automatically manages OAuth token retrieval and refresh as needed.
You can test retrieving a token with the following.
Recommendation:
The URL helpers are convenient for testing and simple integrations,
but production systems should generally sign the original bytes
used to create the media rather than signing a URL. This avoids
dependencies on external hosting infrastructure and guarantees
that the exact content being served was signed.
Signing and Verifying Media Bytes
For images, PDFs, documents, audio, video, and other binary content,
the recommended workflow is to sign the file bytes directly.
with open("image.png", "rb") as f:
image_bytes = f.read()
The browser verifier downloads media directly in order to
compute a SHA-256 hash. The media host must therefore allow
cross-origin requests from the application performing
verification.
If media verification consistently fails while the file loads
correctly in the browser, verify that your hosting platform
includes appropriate CORS headers.
Common hosting providers requiring CORS configuration include:
Google Cloud Storage
Amazon S3
Cloudflare R2
Azure Blob Storage
Custom CDN deployments
The browser verifier fetches media using standard CORS requests
and cannot hash resources that are blocked by the browser's
same-origin policy.
Initialize the Verifier
Create a BlkSealVerifier instance after the browser library has loaded.
Recommended Pattern: Store the Exact Signed Content
Whenever possible, store the exact signed content in a dedicated attribute using data-blkseal-content.
<div
class="ai-message"
data-signature="..."
data-blkseal-content="Exact signed content"
>
<div class="message-content">Exact signed content</div>
</div>
This approach is recommended because it:
Avoids ambiguity caused by HTML formatting or rendering.
Makes the original signed payload explicit.
Improves reliability when working with Markdown or rich content.
Enables visible-content tamper detection.
Verifier Configuration Options
The BlkSealVerifier constructor accepts a configuration object that controls how content is located, extracted, verified, and monitored for changes.
Option
Required
Description
selector
Yes
CSS selector used to identify the outer container for signed content. Verification badges and status information are attached to these elements.
contentSelector
Usually
CSS selector used to locate the element containing the visible content. If omitted, the entire message element is used.
explicitContentAttribute
Recommended
Attribute containing the exact content that was signed. Using this option helps prevent verification failures caused by HTML rendering, formatting changes, or browser modifications.
contentMode
No
Controls how visible content is extracted. Supported values are textContent, innerText, and paragraphs.
paragraphSelector
No
CSS selector used to locate paragraphs when contentMode: "paragraphs" is enabled.
paragraphJoiner
No
String inserted between extracted paragraphs when rebuilding content for verification.
hideOnFailure
No
When enabled, hides content if verification fails or tampering is detected.
showBadges
No
Controls whether verification status badges are displayed. When set to
false, verification still occurs in the background and
hideOnFailure continues to work, but users cannot manually
trigger reverification through badge clicks.
allowBadgeReverify
No
Allows users to click verification badges to manually trigger a new verification request.
watchContentChanges
No
Monitors the DOM for content changes after verification and automatically marks modified content as stale or tampered.
verifyMedia
No
Enables automatic browser verification of signed media such as images, videos, audio files, PDFs, embedded documents, and links.
mediaSignatureAttribute
No
Attribute containing the BlkSeal signature for media elements. Defaults to data-blkseal-media-signature.
mediaStatusAttribute
No
Attribute used to communicate media signing state and verification status. Defaults to data-blkseal-media-status.
mediaSelector
No
Custom selector used to identify signed media elements. If omitted, BlkSeal automatically scans supported media types including images, videos, audio, iframes, embeds, objects, and links.
debug
No
Enables detailed console logging to assist with troubleshooting and integration testing.
Recommended Configuration: For most integrations, set selector, contentSelector, and explicitContentAttribute. These options provide the most reliable browser verification experience.
Media Verification Note:
When verifyMedia is enabled, the browser fetches the media file and computes a SHA-256 hash locally before verification.
If the media file is hosted on a different domain, bucket, CDN, or static hosting service,
that host must allow cross-origin requests from the page performing verification.
A media file may still display normally even when browser-based verification fails because the verification request is subject to CORS rules.
Selector-Based Extraction
If the rendered DOM is considered the source of truth, the verifier can extract content directly from the page using CSS selectors.
The browser library includes a debugging helper named BlkSealDebug.testSelector(). Run it from your browser's developer console to confirm your selectors are extracting the expected content.
Tip: If browser verification is failing unexpectedly, use BlkSealDebug.testSelector() and compare the extracted content against the original signed content. Most browser-side verification issues are caused by content extraction mismatches rather than invalid signatures.
# Return or transmit both values together
# Most integrations will serialize this structure as JSON.
response_payload = {
"content": final_text,
"signature": sign_response,
}
Tip: Using the browser libraries is the easiest way to add visual verification indicators and tamper detection to your application. The libraries automatically verify content against the BlkSeal public verification endpoint and display verification results directly to users.
Note: This browser example assumes blkseal.css, blkseal-browser.js, and a BlkSealVerifier instance have already been configured. See Frontend Browser Verification Helpers.
Important: Always store or verify the exact content that was signed. Verification may fail if the content is changed after signing, including whitespace changes, truncation, text formatting, or other transformations that alter the underlying text.
Server-to-Browser Integration for Media
Media such as images, PDFs, videos, audio files, and other binary content can be signed and verified using the same workflow as text content.
In this pattern, the backend signs the original media bytes and delivers both the media URL and signature to the browser. The browser then downloads the media, computes a SHA-256 hash locally, and verifies the media against the supplied BlkSeal signature.
Recommendation:
Sign the original file bytes whenever possible using sign_bytes(). While the SDK also provides sign_url() and verify_url() helpers that fetch a URL and hash its bytes, signing the original bytes directly is preferred when your application already has access to the file. This ensures the exact content being distributed is what was originally signed.
Backend Example (Python)
with open("logo.png", "rb") as f:
image_bytes = f.read()
Note:
Media verification requires verifyMedia: true in your
BlkSealVerifier configuration. See
Frontend Browser Verification Helpers
for complete setup instructions.
<img
src=""
data-blkseal-media-signature=""
/>
Verification Flow
The browser discovers a supported media element containing a BlkSeal media signature.
The media is downloaded directly from its source URL.
A SHA-256 hash is computed locally in the browser.
The hash is verified with the signature against the BlkSeal public verification endpoint.
A verification badge is displayed to the user.
CORS Requirement:
Because media verification fetches the media file and computes a SHA-256 hash locally in the browser,
media hosted on a different domain, bucket, CDN, or static hosting service must allow cross-origin requests
from the page performing verification. A media file may still display normally even when browser-based
verification fails because the verification request is subject to CORS rules. See
Frontend Browser Verification Helpers
for additional details.
Server-to-Server Integration
Server-to-server integrations are commonly used for APIs, webhooks, agent-to-agent communication, workflow automation, and internal microservices.
In this model, the receiving system verifies the content before processing it.
Use this pattern when your application streams generated content token-by-token or chunk-by-chunk before the final response is complete.
This pattern is commonly used for AI chat interfaces, assistants, live generation workflows, and other applications where users see content appear progressively.
Recommended Event Order for Text Streams
For text-only streaming integrations, the recommended event order is:
start
token
token
token
signed OR signature_error OR signature_skipped
complete
Important: Sign the final assembled content, then send the signed event before sending complete. This allows the browser to verify the final message as soon as the stream finishes.
Backend SSE Helper
Server-Sent Events require each event to include an event name and JSON payload.
The backend should collect streamed chunks, assemble the final text, sign the final text, and then emit a signing result event before closing the stream.
This example uses the BlkSeal Python SDK within a Django application and Server-Sent Events (SSE). The same signing pattern can
be adapted to other frameworks such as FastAPI, Flask, Express.js, .NET, Go, or any platform capable of streaming content.
import os
from typing import Iterator
from django.http import StreamingHttpResponse
from lyfeninja_blkseal import (
BlkSealError,
BlkSealAuthError,
BlkSealAPIError,
BlkSealInputError,
)
The frontend should render tokens as they arrive, then attach the final signature to the completed message when the signed event is received.
Tip: Using the browser libraries is the easiest way to add visual verification indicators and tamper detection to your application. The libraries automatically verify content against the BlkSeal public verification endpoint and display verification results directly to users.
Note: This browser example assumes blkseal.css, blkseal-browser.js, and a BlkSealVerifier instance have already been configured. See Frontend Browser Verification Helpers.
Media Verification:
If your stream can return signed media, enable verifyMedia: true.
See Frontend Browser Verification Helpers
for the full browser helper setup and CORS requirements.
SSE Event Listeners
const eventSource = new EventSource("/stream?message=hello");
Best Practice: The browser should verify the exact final text that was signed by the backend. For streaming integrations, this usually means waiting until the signed event, storing the completed message in data-blkseal-content, and then triggering verification.
Streaming Signed Media
Streaming applications can also deliver signed media alongside signed text responses.
This is useful for AI assistants, generated reports, image generation workflows,
document previews, audio/video responses, and other applications where the final
response may include both text and media.
The recommended pattern is to stream the visible text normally, then stream media
metadata and media signatures as separate SSE events.
Recommended Event Order with Media
When a stream includes both signed text and signed media, a typical event order is:
start
token
token
media
media_signed OR media_signature_error OR media_signature_skipped
signed OR signature_error OR signature_skipped
complete
Recommendation:
Sign the final assembled text for message verification, and sign the original
media bytes for media verification. Avoid signing the media URL itself unless
you specifically want to verify the URL string rather than the file content.
Backend Media Signing Example
In this example, the backend reads the generated media bytes, signs the bytes,
then streams both the media URL and the media signature to the browser.
def stream_media_response():
message_id = save_message_somehow("Here is a signed image.")
image_url = upload_or_get_media_url("generated_image.png")
CORS Requirement:
Browser media verification requires the browser to fetch the media file and compute a SHA-256 hash locally.
If the media file is hosted on a different domain, bucket, CDN, or static hosting service,
that host must allow cross-origin requests from the page performing verification.
A media file may still display normally even when browser-based verification fails because the verification request is subject to CORS rules.
See Frontend Browser Verification Helpers.
This section applies to browser-based integrations using blkseal-browser.js.
When watchContentChanges: true is enabled, the browser verifier watches signed content for DOM or text changes after verification.
How Tamper Detection Works
The most reliable tamper detection pattern is to store the exact signed content in data-blkseal-content.
data-blkseal-content="original signed content"
If the visible message content changes and no longer matches the explicit signed content, the verifier marks the message as tampered.
Content Tampered
If the content changes but no explicit signed content is available, the verifier cannot determine whether the change is malicious or expected. In that case, the badge changes to:
Content Changed - Reverify
If allowBadgeReverify: true is enabled, users can click the badge to run verification again.
Best Practice: Use data-blkseal-content whenever possible. This allows the browser verifier to compare the visible rendered content against the exact content that was signed.
Badge States
The default BlkSeal CSS includes badge styles for common verification, signing, and tamper-detection states.
Badge
Meaning
Verifying...
Verification request is currently in progress.
Verified
The content and signature match.
Verification Failed
The verification API responded successfully, but the content did not match the signature.
Verification Error
The verification request could not be completed, usually because of a network, endpoint, or response error.
Signature Error
Signing failed server-side, so no usable signature was returned.
Unsigned
Signing was skipped, disabled, or not configured for this response.
Content Changed - Reverify
The DOM changed after verification. The user can re-run verification if badge re-verification is enabled.
Content Tampered
The visible content no longer matches the explicit signed content stored in data-blkseal-content.
Failure Handling
By default, failed or tampered content remains visible with a warning badge. For stricter applications, enable hideOnFailure to hide content when verification fails.
The right failure behavior depends on your use case. Low-risk applications may only need to show a warning badge, while high-trust workflows may choose to hide or block unverified content.
BlkSeal helps verify that signed content still matches the content originally signed by the source system.
Browser verification is a useful trust signal, but it is not a tamper-proof execution environment.
What Browser Verification Can Help Detect
Browser extension manipulation
DOM tampering
Injected scripts
Accidental frontend changes
Content altered after signing
Content rendered differently than the signed payload
Important Limitations
A user with full control of their browser, developer tools, local JavaScript runtime, or device can modify the page, disable JavaScript, block network calls, or alter local state.
For this reason, browser-side verification should not be treated as the only control for high-assurance workflows.
Recommended Practices
Keep OAuth client secrets server-side only.
Sign finalized content before delivering it to the client or receiving system.
Use data-blkseal-content to preserve the exact signed payload for browser verification.
Use server-side verification for sensitive actions, transactions, approvals, or audit workflows.
Log verification failures, signature errors, and tamper-detection events when appropriate.
Use the public verification endpoint for browser validation and private verification for authenticated backend workflows.
High-Assurance Workflows: For sensitive use cases, provide server-side verification, an external verification page, or both. Browser badges are helpful for user-facing transparency, but backend verification should be used when verification results affect access, payments, approvals, compliance records, or other important decisions.
Use this pattern when signing files, binary data, large payloads, images, PDFs, documents, archives, model artifacts, or other content that should not be sent directly to the signing service.
Instead of sending the original bytes, compute a SHA-256 hash of the content and sign the hash using data_type="hash".
Important: The BlkSeal Python SDK automatically hashes bytes locally when using sign_bytes() or verify_bytes(). The original file contents are not sent to the BlkSeal signing or verification service.
Python SDK Example
Sign a File
# Open file as bytes
with open("document.pdf", "rb") as f:
file_bytes = f.read()
# The SDK hashes the bytes locally and signs the hash.
response = client.sign_bytes(
lease_id=lyfeninja_lease_id,
data=file_bytes,
)
signature_b64 = response["signature_b64"]
Verify a File
# Open file as bytes
with open("document.pdf", "rb") as f:
file_bytes = f.read()
# The SDK hashes the bytes locally and verifies the hash.
result = client.verify_bytes(
data=file_bytes,
signature_b64=signature_b64,
)
print(result)
Raw API Example
Without the SDK, compute the SHA-256 hash of the file yourself, then call the signing or verification endpoint with data_type="hash".
Compute a SHA-256 Hash
import hashlib
with open("document.pdf", "rb") as f:
file_bytes = f.read()
Recommendation: Use sign_text() for ordinary text content such as AI responses, messages, and API responses. Use sign_bytes() or data_type="hash" for files, binary data, large content, or payloads you do not want to transmit directly.